extend the Android client functionalities [since
4.1]
The  OberonClient class contains all basic functionalities
to develop a simple Android app; when you develop your application,
you will probably need to extend the client with a specialized functions.
For a web-application, you can create additional JSP pages or servlet
linked by command urls, and add/edit css styles or javascript scripts
to implement different behaviours or set the look and feel. OberonClient class contains all basic functionalities
to develop a simple Android app; when you develop your application,
you will probably need to extend the client with a specialized functions.
For a web-application, you can create additional JSP pages or servlet
linked by command urls, and add/edit css styles or javascript scripts
to implement different behaviours or set the look and feel.
For a mobile and desktop application you can extend the basic class OberonClient; in particular, you should:
- manage the page urls defined inside the commands by adding redirect
conditions to the handleRequest method.
- write the "handle" method to perform the new function(s)
- operate modifications to the Android control's styles to set the graphical
aspect.
- use a different package name for each application otherwise you will not be able to commit it to the Google Play store
Redirecting custom URLs
As said before, the most important method of a mobile
client class is:
handleRequest(ApplicationRequest
request)
This method redirects the request to another specific method according to the requested page (or URL) declared inside the ApplicationRequest itself. It means that for each web URL associated with menu commands there should be a method that represents the equivalent web-page in Android format. The handleRequest method, defined inside the OberonClient class, redirects basic URLs to predefined handle methods. You can override this method, but differently respect to the SWT custom client, the choice is delayed to allow the UI thread to show the "Loading..." message indicator. You have to copy all possible choices and add your pages / functions at the end of the "if-"else" sequence:
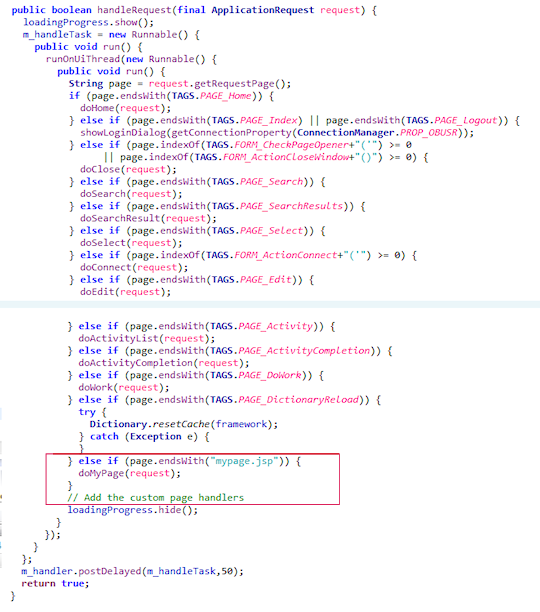
NOTE: In some cases, you want also change the behaviour of some
basic operations (for example to create a custom home page). These
modifications can be performed by defining custom methods, named
as the basic method in a manner (for example doHome) to "override"
the predefined actions.
The following example show how to implement a custom
basic function:
mypage.jsp -> doMyPage
|
public void doMyPage(ApplicationRequest
request) {
try
{
|
| |
// Get the session
if you need it
ApplicationSession session = (ApplicationSession) request.getSession();
// Define
title and subtitle for the menu bar
String sTitle = "My
Page Title";
String sSubTitle = "My
Page SubTitle"; |
| |
// Creates
the page container (includes the menu bar with title and
subtitle)
LinearLayout globalpanel = createPagePanel(this, sTitle,
sSubTitle, !bCreateNew, request);
if (globalpanel!=null)
{ |
| |
|
// Define the
Android panel
ScrollView panel = new ScrollView(globalpanel.getContext());
........... Add the content the the ScrollView panel ...........
LinearLayout.LayoutParams params = new LinearLayout.LayoutParams( LinearLayout .LayoutParams.FILL_PARENT, LinearLayout.LayoutParams.FILL_PARENT);
globalpanel.addView(panel,params);
// Add the page container to
the application window (tab widget or alert dialog)
addPageToContainer(globalpanel,sTitle,request); |
| |
} |
|
}
catch (Exception
ex) { log(ex.getMessage()); }
}
|
|
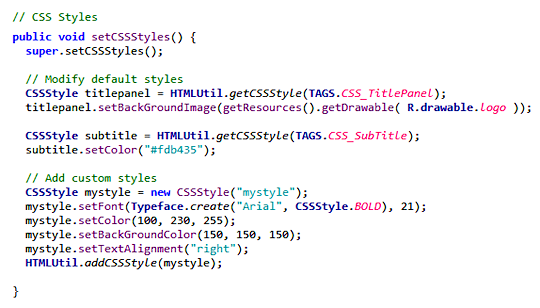
Changing the look and feel
Finally, you can operate modifications to the Android control's
styles to set the graphical aspect by replacing the basic method
setCSSStyles. In particular, inside this method you can define
new styles or apply changes to default styles; the following example
shows how to write the code:
Pre-defined styles are:
| |
CSS_TitlePanel
|
the horizontal banner where the title
and subtitle are placed |
| |
CSS_Title
|
the title text |
| |
CSS_SubTitle |
the sub-title text |
| |
CSS_ObjectMenu
|
the horizontal banner
where the object's contextual buttons are placed |
| |
|
|
| |
CSS_Form
|
the form style |
| |
CSS_Cell
|
the style of form's cells |
| |
CSS_LabelCell
|
field (description)
label |
| |
CSS_Label
|
generic text |
| |
CSS_Section
|
section separator
banner |
| |
|
|
| |
CSS_Text
|
text field style |
| |
CSS_TextArea
|
textarea field style |
| |
CSS_Select
|
combo field style |
| |
CSS_List
|
multi-selection combo field style |
| |
CSS_Checkbox
|
checkbox / radio button style |
| |
CSS_Href
|
web link style |
| |
CSS_Image
|
image and embedded object style |
| |
CSS_StaticText
|
static text |
| |
CSS_ButtonBar
|
button bar style |
| |
CSS_Button
|
form - buttons |
NOTE: Images used to customize the look and feel
must be placed inside the "res/drawable" folder of Eclipse project.
|


